

A-Pillar Light Mount Guide: Fitment, Wiring, Aiming, and Glare
A practical guide to why the a-pillar position is popular, confirm exact mechanical fit, and choose the beam and orientation, with decision checks, sources, and FAQs.
An A-pillar light mount is a bracket that attaches an auxiliary lamp near a vehicle’s windshield pillar or cowl. It can provide a high, forward or side-facing mounting point, but fitment is vehicle-, year- and bracket-specific. Verify mounting holes, load, corrosion protection, door and hood clearance, airbag and sensor areas, wiring route, electrical protection, beam pattern, glare and local road-use rules before installation.
Why the A-pillar position is popular

The location is above many bumper obstructions, close to existing body structure and convenient for forward or side illumination. It may suit trail spotting, work at low speed or scene lighting. The same height can reflect light from the hood, windshield, mirrors, dust, rain or snow. A mounting position that photographs well may reduce real visibility. Define the beam’s task and compare alternative locations before drilling or buying a bracket.
Confirm exact mechanical fit
Match the bracket to vehicle make, model, body generation, year and left/right location. Check whether it uses factory fasteners, a hinge, cowl bolt or a clamp, and whether the manufacturer permits reuse of that attachment. Confirm lamp mass and projected area. Open doors and hood fully, operate wipers, fold mirrors and inspect weather seals. Do not place hardware where it can interfere with airbags, cameras, antennas, washer paths or structural crumple zones.
Choose the beam and orientation
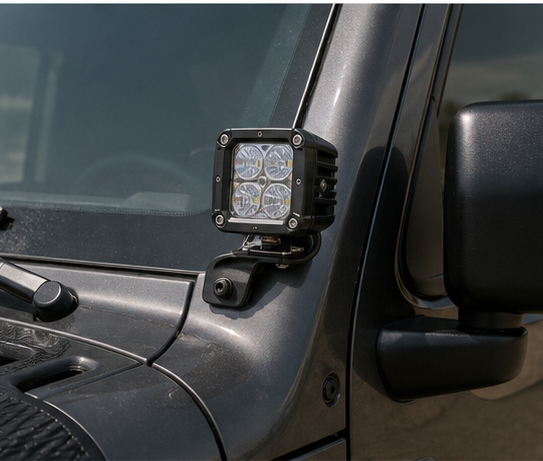
A narrow spot supports longer forward reach; a flood or scene optic covers a wider nearby area. Side-facing ditch lights can reveal trail edges at low speed but may dazzle road users when misused. Mount both lamps symmetrically where the task requires it, then aim on level ground under normal load. Keep the brightest region below sensitive sight lines and check reflections from the vehicle. Final evaluation should occur on private property under controlled conditions.
Wire the circuit safely
Use lamp input current and the vehicle manufacturer’s accessory guidance to choose conductor, relay or control module, switch and overcurrent protection. Put protection near the power source as directed and route abrasion-resistant cable away from exhaust, hinges, sharp metal and moving parts. Use sealed connectors and a protected body pass-through. Modern vehicles may use managed accessory circuits or data-bus controls; do not splice a convenient wire based on color alone.
Fasteners and long-term inspection
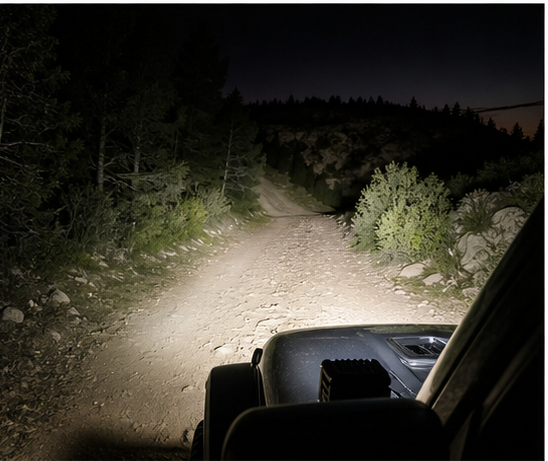
Prepare surfaces and use the supplied hardware, isolators, thread treatment and torque values. Excess torque can distort sheet metal or damage a hinge; too little allows vibration and aim drift. Avoid mixing metals without considering galvanic corrosion. After installation, recheck clearance, cable support and aim, then inspect after the first operating period and rough travel. Cracks, loose hardware, paint wear, water entry or repeated lamp movement require correction before use.
Legal and road-use limits
Auxiliary-lamp color, number, height, covers, switching and permitted road use vary by jurisdiction. An off-road label does not authorize public-road use. Wire and operate the system so prohibited lamps cannot create glare or misleading signals. Keep the original required vehicle lighting unobstructed and functional. If the bracket maker or vehicle maker does not document compatibility, obtain professional review rather than treating community fitment photos as approval.
Decision table
| Check | Evidence needed | Decision purpose |
|---|---|---|
| Vehicle fit | Exact model, generation, year and side | Avoid incompatible bracket |
| Mechanical load | Lamp mass, wind area and approved fastener | Prevent loosening or body damage |
| Clearance | Door, hood, wiper, mirror and seal movement | Avoid interference |
| Electrical | Current, harness, protection and control | Protect vehicle wiring |
| Optical/legal | Beam, aim, glare and road rules | Use safely and lawfully |
How to use this guide responsibly
This guide explains a decision process, not a substitute for the current product manual, professional diagnosis, engineering approval, medical care, or local legal requirements. Search results often compress a complex decision into a single answer. A safe conclusion needs the exact equipment or symptom, operating context, applicable jurisdiction, and evidence that can be checked. Keep model numbers, photographs, measurements, dates and instructions together so another qualified person can reproduce the decision.
Start with the lowest-risk observation. Do not defeat guards, interlocks, protective devices or warnings to obtain a reading. If the task involves energy, gas, structural loads, moving equipment, impaired vision or public safety, stop when conditions exceed your competence. The correct escalation is part of a successful diagnosis, not a failure to finish the job.
Evidence and documentation checklist
- Exact product, vehicle, appliance or system identity, including model and year where relevant
- Current manufacturer instructions and configuration-specific drawings
- Observed symptom or required outcome written in measurable terms
- Operating conditions, changes, previous work and environmental factors
- Applicable safety, electrical, structural, medical or road-use requirements
- Measurements recorded with instrument, units, test point and system state
- Decision, responsible person, corrective action and final verification
Do not convert a marketing phrase into a technical claim. Ratings only apply to the configuration and conditions stated by the issuer. When evidence conflicts, use the more conservative safe state while obtaining clarification from the manufacturer, authority or qualified professional.
Common mistakes to avoid
- Buying or acting from a keyword, photograph or marketplace title without identifying the exact system
- Changing several variables at once and losing the ability to identify the cause
- Using a measurement without units, load condition, reference point or instrument limitations
- Assuming a familiar symptom always has the same cause
- Bypassing protection or increasing a fuse, limit or rating to make a problem disappear
- Copying a competitor’s claim without checking primary documentation
- Treating a temporary improvement as proof that the underlying issue is resolved
Connection to professional area lighting
Keyyou manufactures mobile lighting equipment for temporary outdoor and industrial applications. The subject of this guide may sit outside that product range, so no Keyyou product claim is implied. Readers planning construction, remote-site or emergency illumination can review the portable tower lighting guide, the jobsite lighting planning guide, and the light tower inspection checklist. Those resources address large-area mobile lighting rather than the specialized device discussed here.
Authoritative references
Video explanation
The following video is included as a visual introduction. Verify every action against the exact product instructions and the safety boundaries in this article.

Watch A-Pillar Light Mount Bracket Installation Example on YouTube (DV8 Offroad).
Frequently asked questions
Do A-pillar mounts require drilling?
Some use factory points and others require modification. Check the exact bracket instructions and implications for structure, corrosion and warranty.
Are A-pillar lights street legal?
Rules vary by location and lamp configuration. Off-road availability is not proof of legal on-road use.
Why do ditch lights glare off the hood?
Mounting height, inward aim and wide optics can illuminate nearby bodywork. Repositioning, shielding or changing optics may be needed.
Can I power them from a factory auxiliary switch?
Only if the vehicle and lamp documentation confirm the circuit rating and connection method; otherwise use an approved protected harness.
Final takeaway
The final decision should account for why the a-pillar position is popular and confirm exact mechanical fit. Verify the exact product or situation, follow the controlling instructions, document the evidence, and escalate any condition that exceeds the limits described in this guide.


